
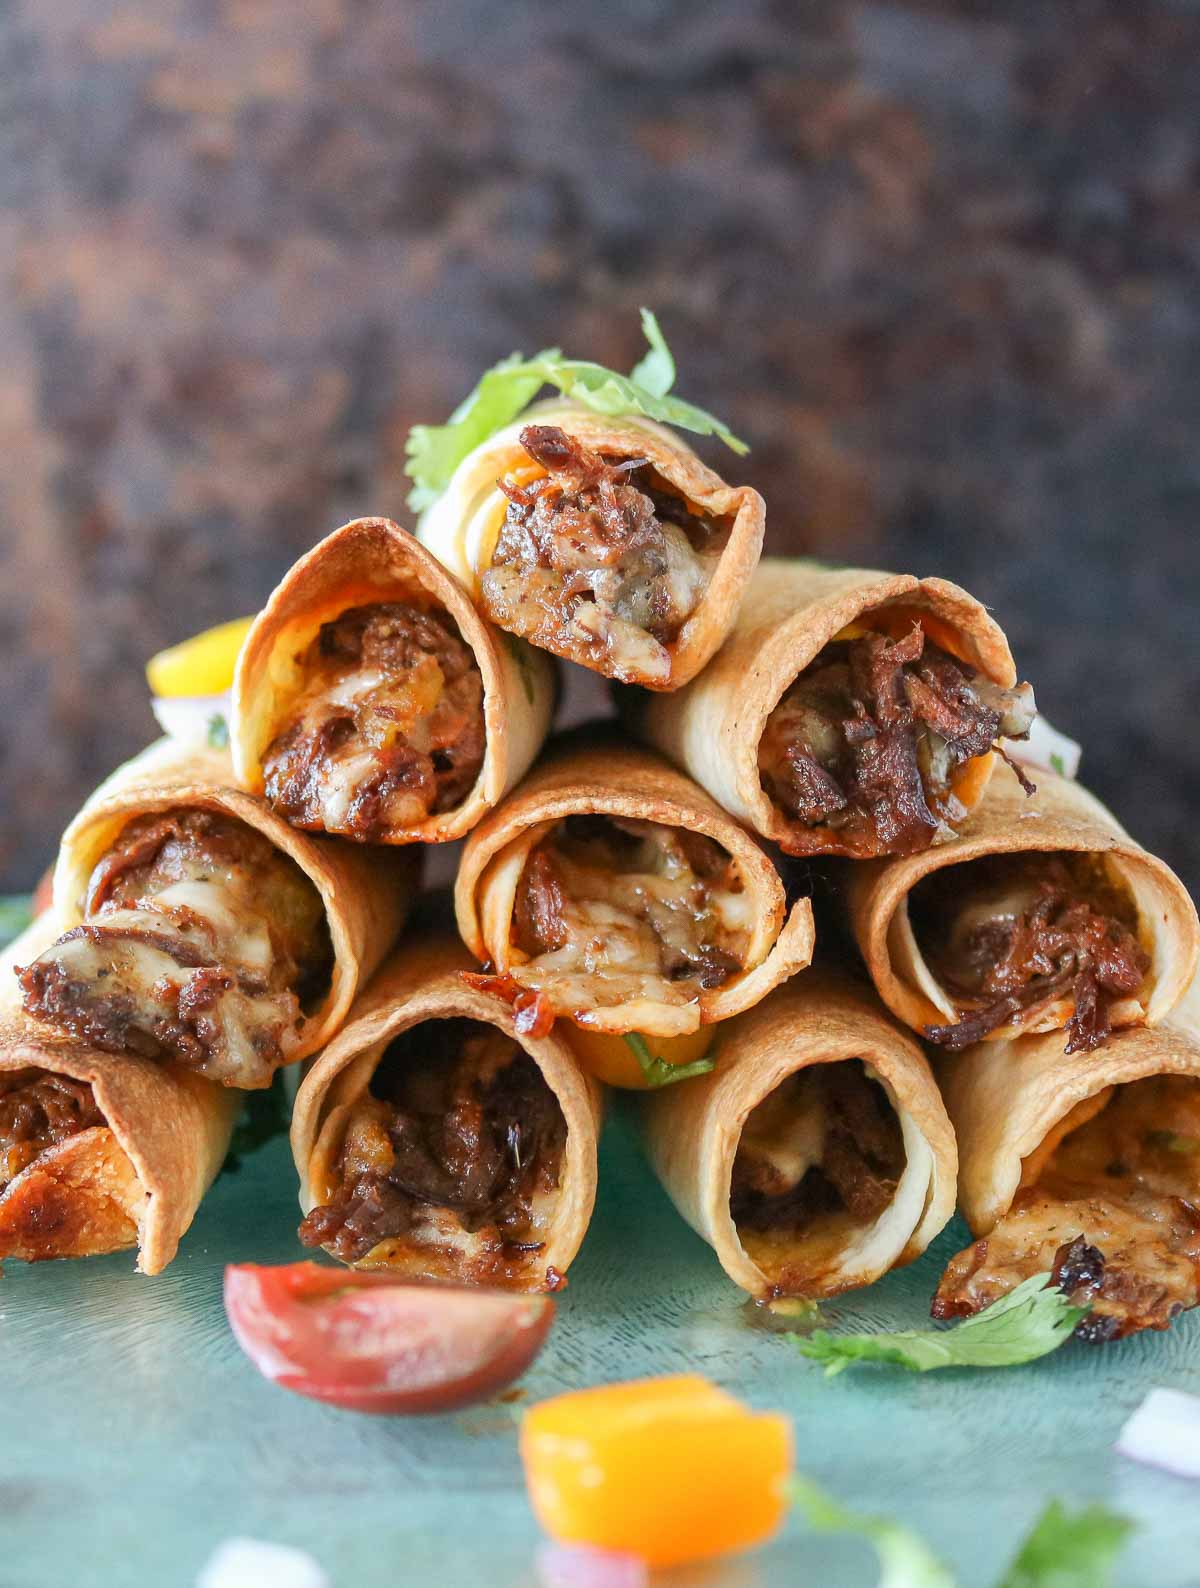
With tender, shredded moose meat, Monterey Jack cheese, chopped green chilies and lots of flavourful seasonings, these homemade moose taquitos are so easy and delicious, perfect for a satisfying appetizer or game day!
Today I’m sharing another moose meat recipe that I hope you’ll love!
This baked taquito recipe is inspired by moose taquitos that we had this past summer at a local restaurant.
Of course, we’re no stranger to having moose, but we hadn’t tried it in taquito form. We were so pleasantly surprised at how good they were, and I knew I had to try a homemade version.
So, the next time I cooked a moose roast, I made sure I had leftovers to make taquitos. What a treat!
How To Make Moose Taquitos
Here is an overview of how to make baked moose taquitos (full details are in the recipe card below, as well as the method for shallow frying them):
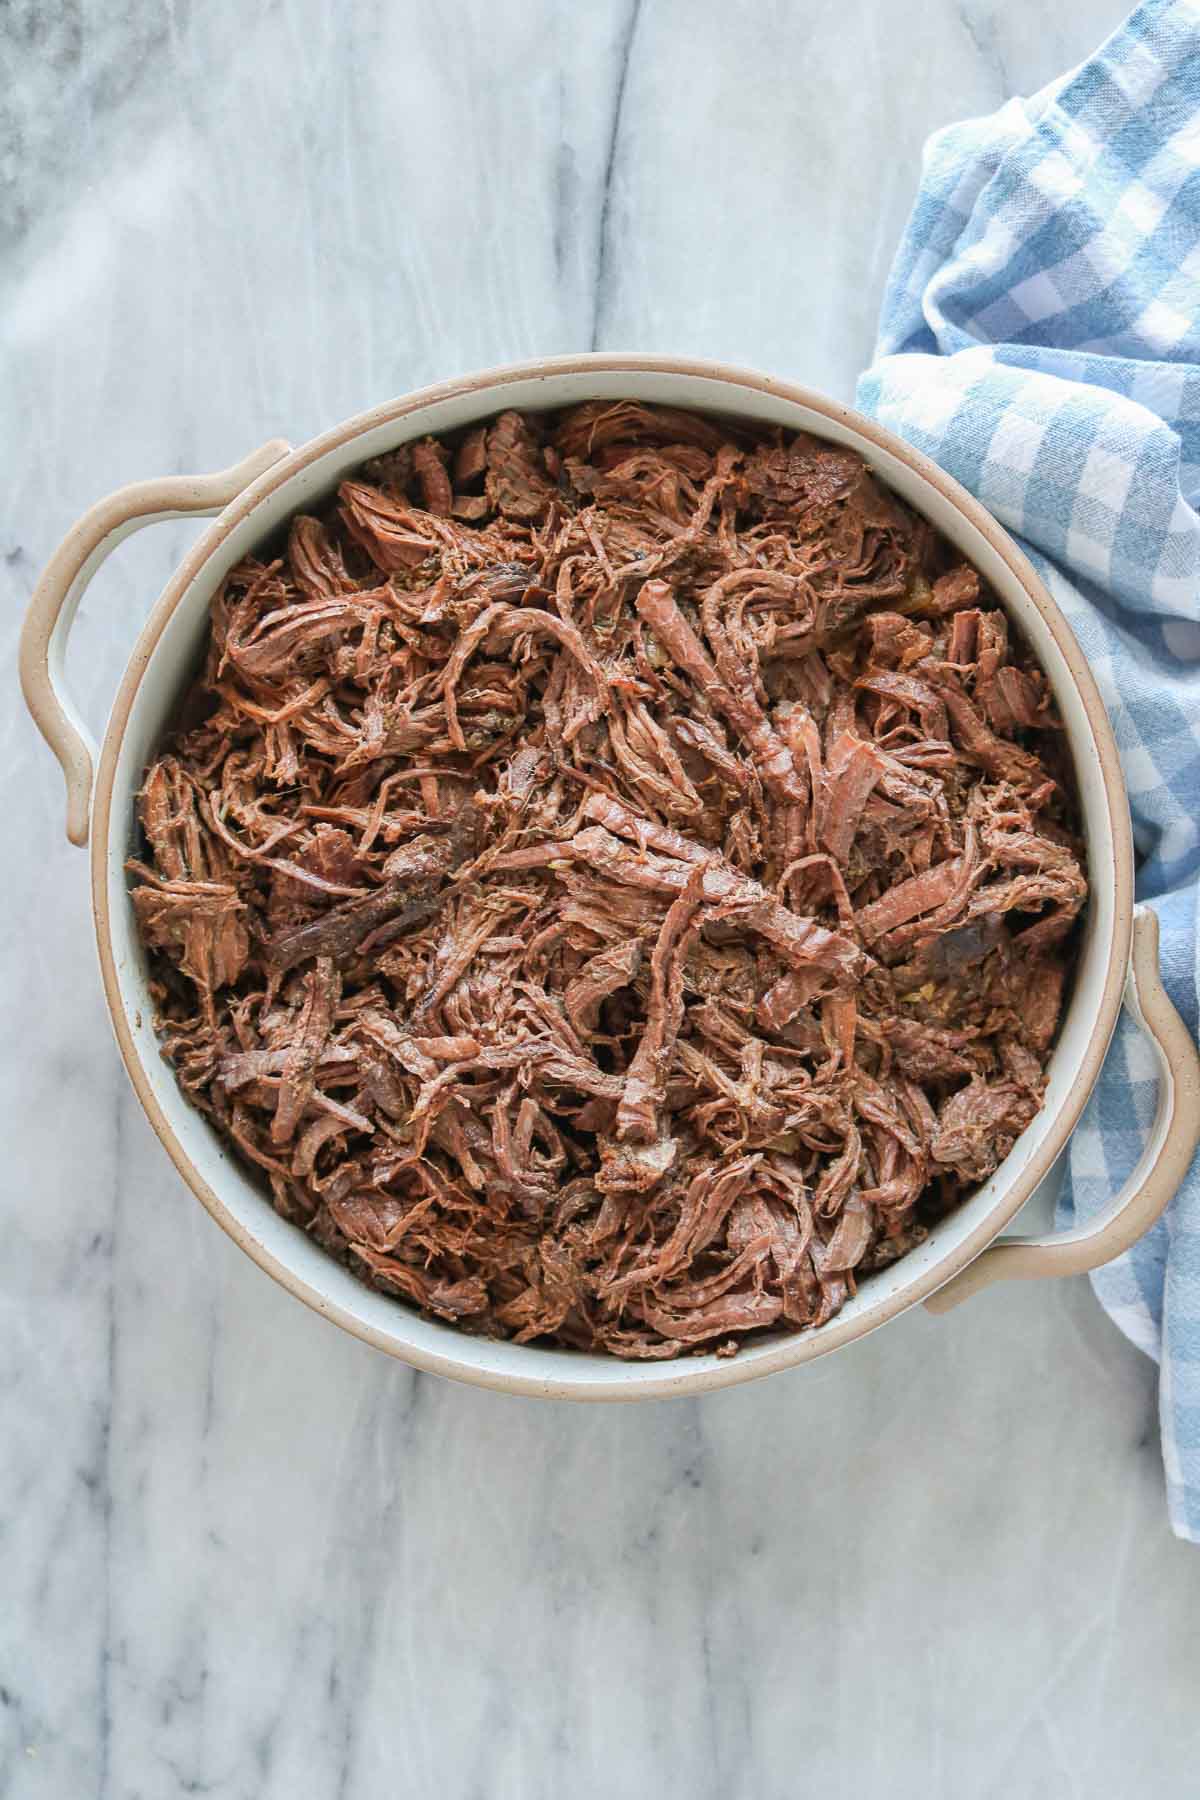
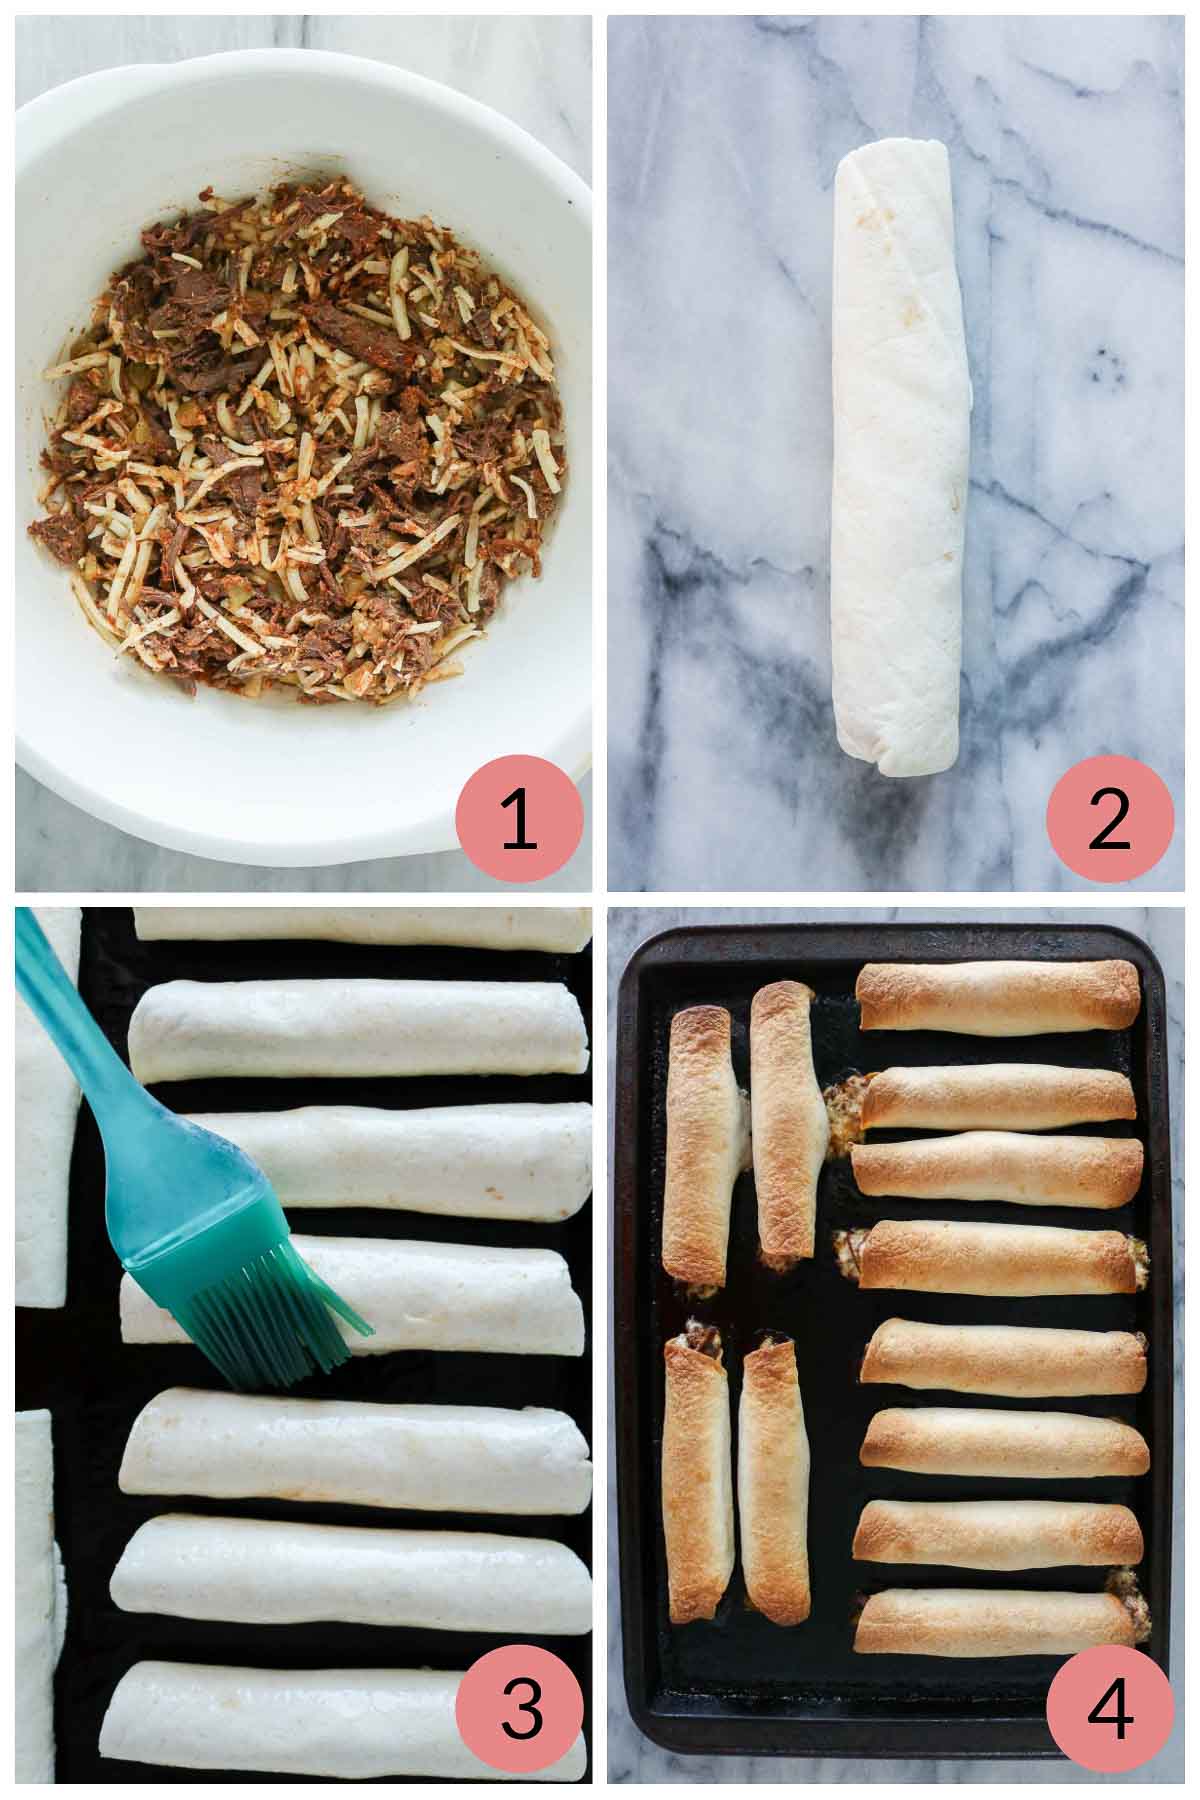
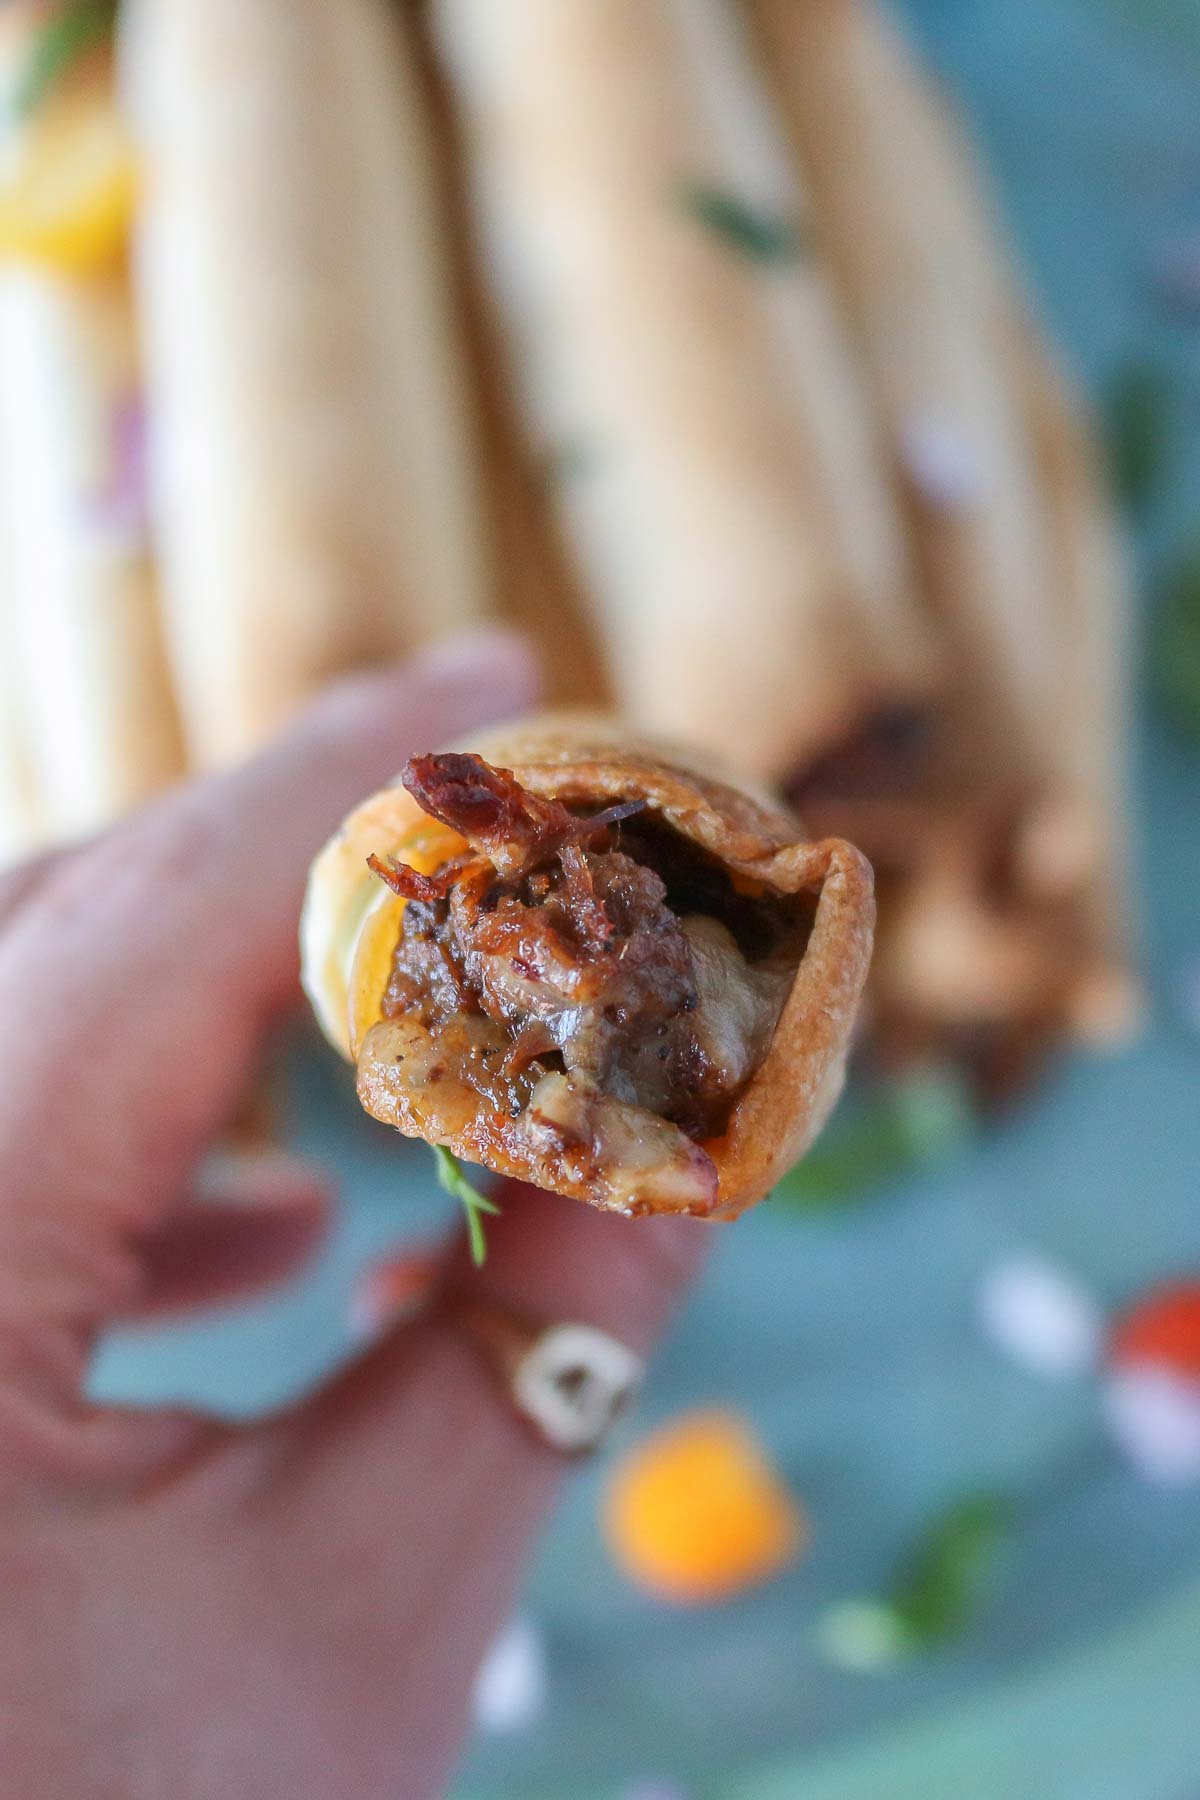
- In a large mixing bowl, combine cooked shredded moose meat, a bunch of yummy seasonings, chopped green chilies and shredded cheese.
- Assemble the taquitos and place onto a greased (or parchment paper-lined) sheet pan.
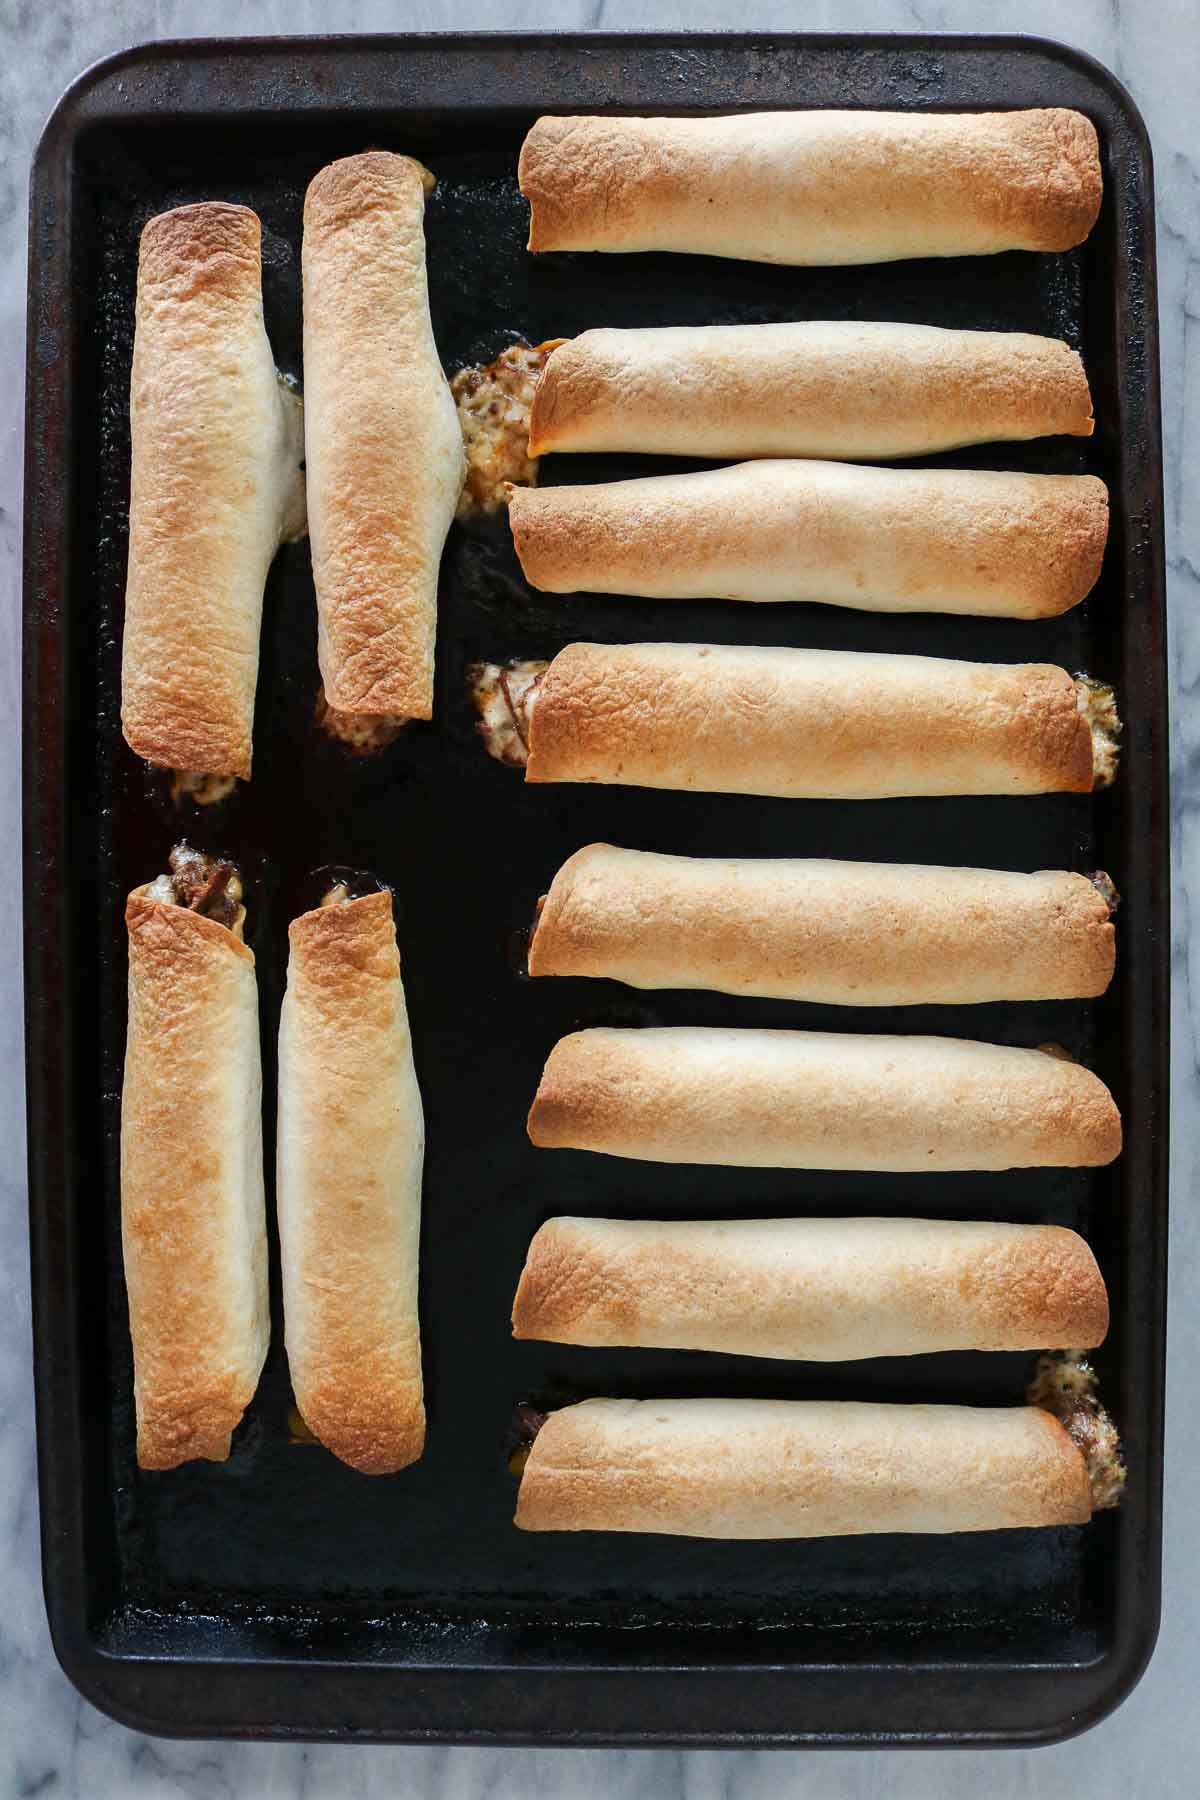
- Brush the taquitos with corn oil (or lightly spray with cooking spray).
- Bake the taquitos until they’re golden brown and crispy on the outside and heated through.
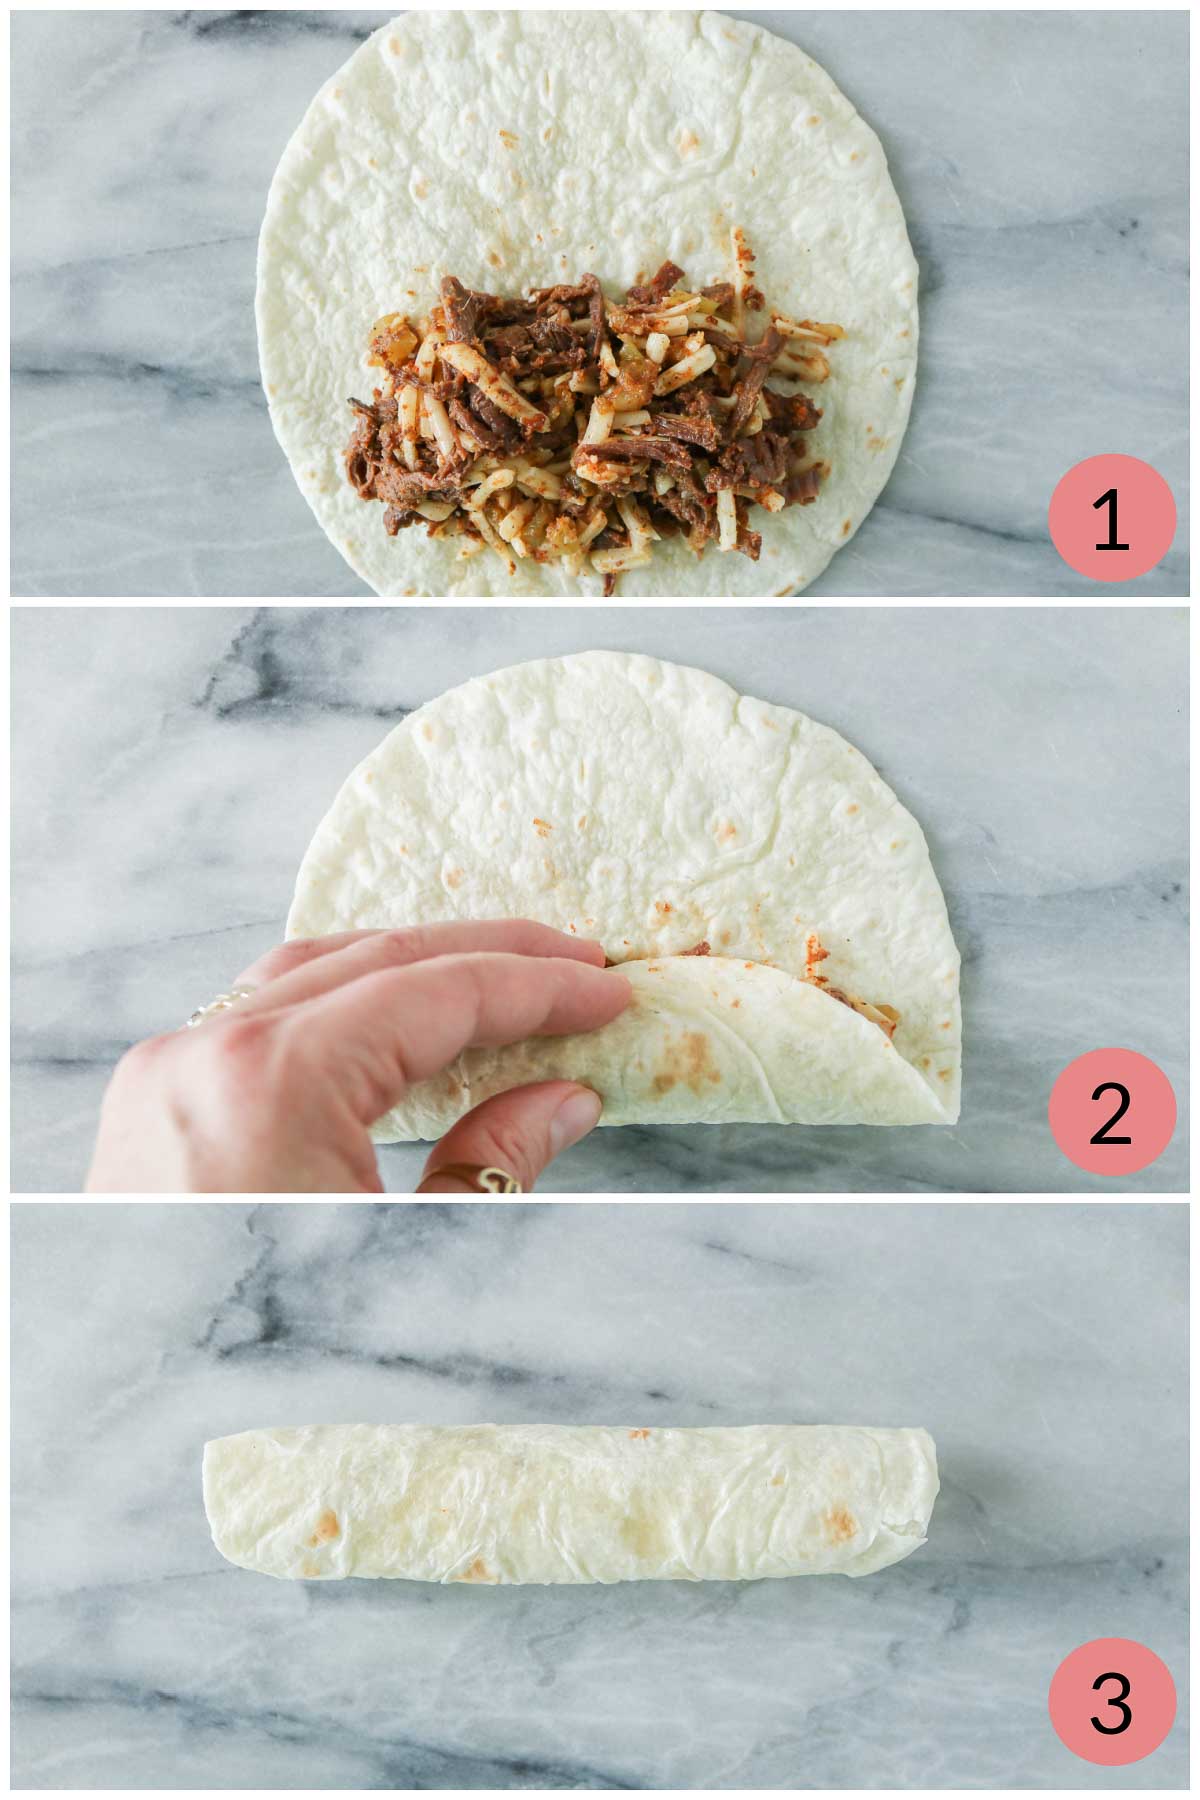
How To Roll Taquitos
- Place some of the taquito filling (about 2 tablespoons) onto a warmed tortilla.
- To roll, start from the filling end. Bring the bottom of the tortilla up over the filling, gently folding in and rolling up as you go along. (You can see why taquitos are also known as “rolled tacos”, can’t ya?)
- There ya have it, a taquito all ready to be baked (or fried)! You basically continue this process until all your taquito filling is used up.
Tip: You may be tempted to add lots of filling to the taquitos. I understand. More filling means more deliciousness. However, don’t do it. You don’t want to run the chance of having your taquito bursting open or not properly closing by having it too full.
Baked Versus Fried
I’m pretty sure the restaurant fried their version of moose taquitos. However, most times when I make homemade taquitos, I prefer to bake them instead.
Both cooking methods are pretty easy, but I find baking a tad quicker and easier. The reason being is that all of the taquitos are baked at once and the oven does most of the work. Fried taquitos, however, require a little more hands-on time.
Compared to baked taquitos, fried taquitos are a bit crispier and a little more indulgent. However, both cooking methods yield delicious results. I mean, meat and cheese filled crispy tortillas? How could it not be yummy?!
When I do opt to fry taquitos, I often use corn oil. You can use another variety, just pick a cooking oil suitable for frying.
Whether baked or fried, cook them whatever way you enjoy best!
The photos shown are the baked variety, but instructions for both baked and shallow fried taquitos are in the recipe card below.
Can I Use Roast Beef Instead?
Absolutely! If you don’t have cooked moose meat on hand, cooked roast beef is a great substitute. I realize that moose meat may not be as readily available to some people as would a beef roast.
Something to keep in mind, too, is that moose is generally quite a bit leaner than beef. Plus, it’s a tad more gamey in flavour.
Therefore, overall, if you use roast beef instead of moose meat, your taquitos will be just slightly different in richness and taste. But, honestly, both work in this baked taquito recipe.
Whether it’s beef taquitos or moose taquitos, they’re sure to disappear fast as soon as they hit the table!
Type of Tortilla To Use
Corn tortillas are more traditional when making taquitos. However, having said that, I used flour tortillas because that’s what the restaurant used. Plus, they’re more readily available here in Newfoundland. I have come across corn tortillas here in this province, but they’re not usually super fresh, pliable or easy to work with. So, flour tortillas it is!
Before assembling the taquitos, I warm the tortillas in a microwave just to soften them and make them nice and pliable. Depending on how fresh the tortillas are and the brand itself, sometimes this is not necessary.
Type of Cheese To Use
You definitely want a nice melting cheese. I used Monterey Jack for this taquitos recipe, but feel free to use other varieties of shredded cheese (or a couple of your favourites).
Other delicious options are cheddar cheese and mozzarella cheese. A sprinkling of queso fresco or cotija cheese (along with a nice melty cheese) in the taquito filling is also quite yummy.
Tip: I have definitely used store-bought pre-shredded cheese when making taquitos (or other recipes, for that matter). Haven’t we all? It’s just sometimes convenient, especially when I’m trying to get dinner on the table quickly. However, while you can certainly use pre-shredded cheese, for best melty cheese results, it’s best to shred the cheese yourself.
What To Serve With Taquitos
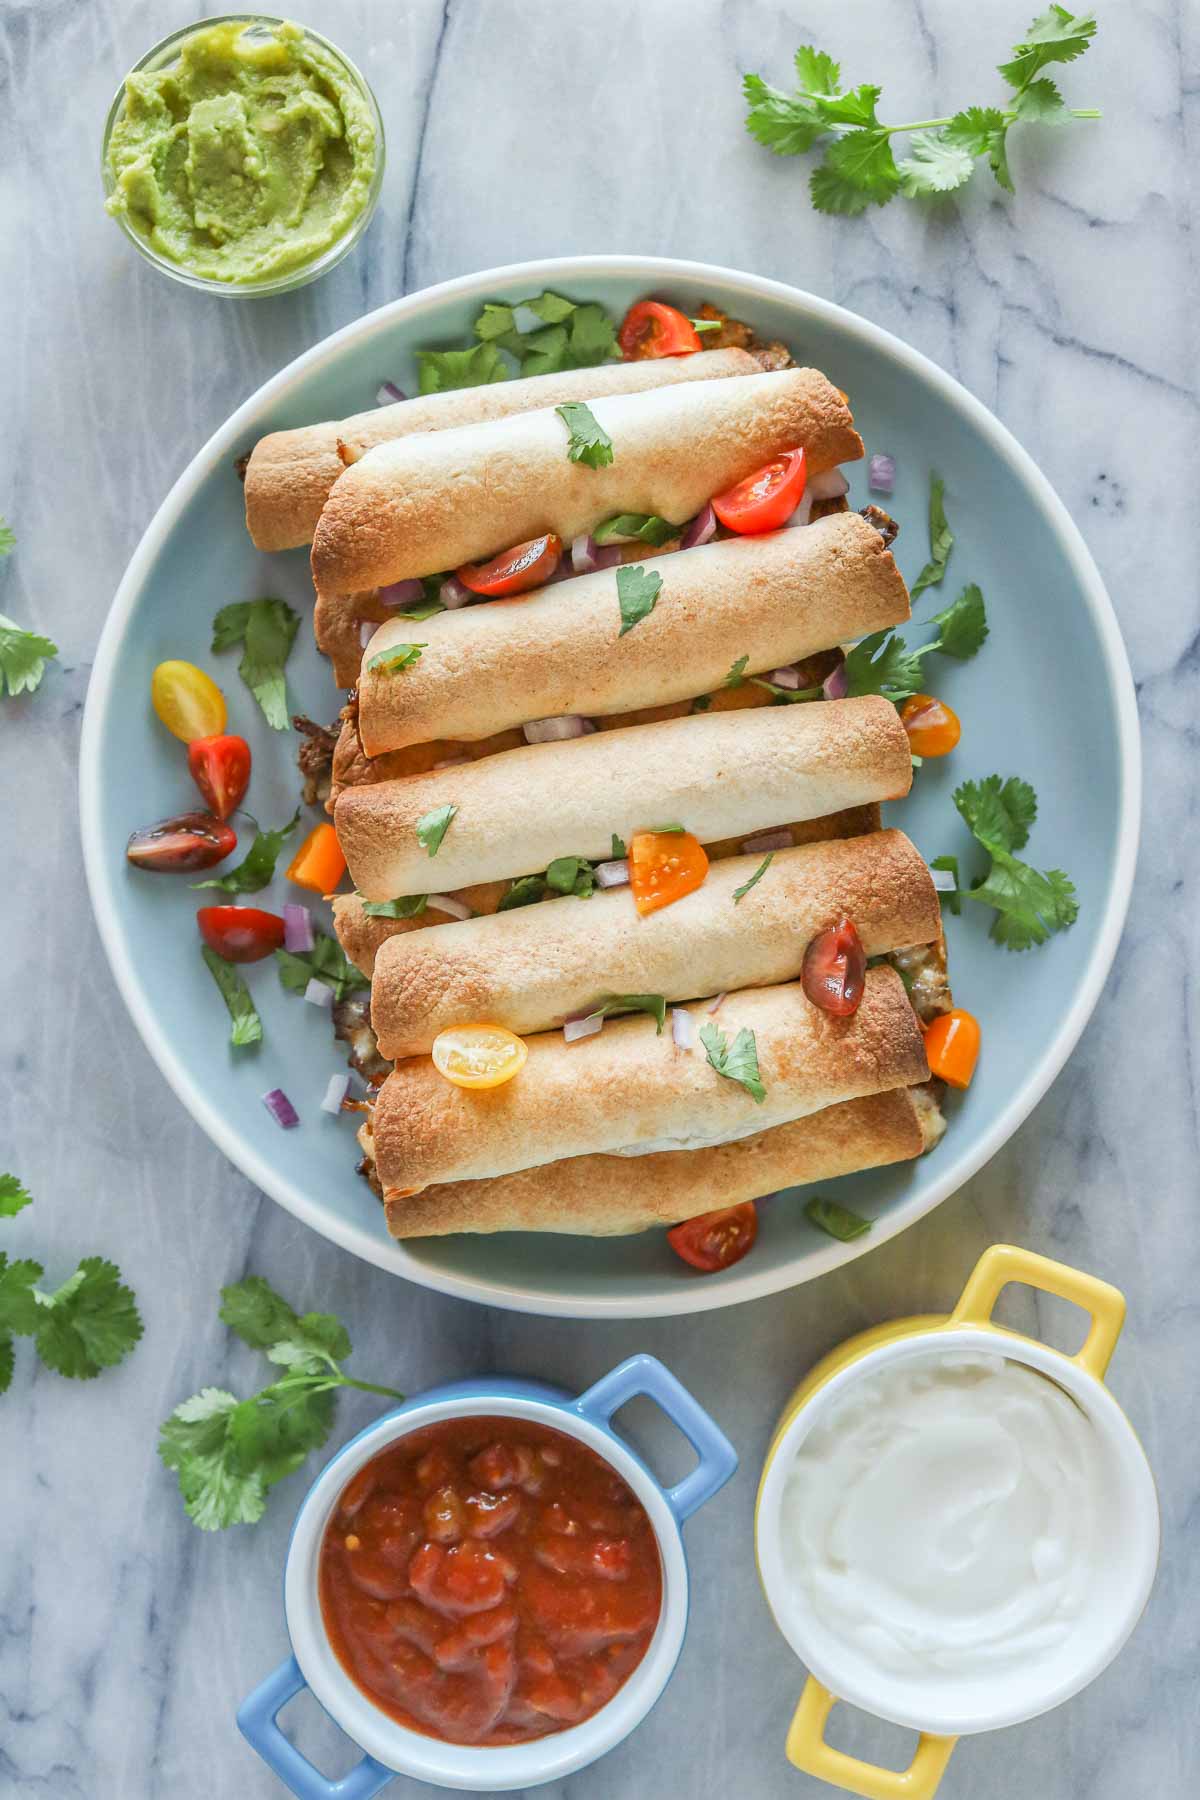
Taquitos are often served as an appetizer (which is how hubby and I usually enjoy them).
I love serving taquitos with lots of fresh toppings and sauces/dips. Some of my favourite toppings and dips to serve with taquitos are:
- Chopped cilantro
- Chopped green or red onion
- Shredded lettuce
- Diced tomatoes
- Crumbled cotija cheese
- Salsa
- Guacamole
- Sour cream, Mexican crema or plain Greek yogurt (a personal fave)
If you want to serve the taquitos as a main dish, they pair lovely with quinoa salad, double baked sweet potatoes, refried beans, rice or tortilla chips and salsa.
Leftovers and Storing
Properly store leftover taquitos in an airtight container in the refrigerator and enjoy within 3 to 4 days (assuming you are using freshly prepared moose meat). Reheat before serving.
Reheating Taquitos
Stovetop: Heat a little vegetable or corn oil in a skillet over medium heat. Add the taquitos (in batches, if necessary) and cook, moving the taquitos around the pan so they reheat evenly, for about 5 to 6 minutes or until heated through.
Oven: Preheat the oven to 400 degrees Fahrenheit. Place the taquitos on a sheet pan and bake for about 10 to 12 minutes or until heated through.
Air Fryer: Heat the air fryer to 400 degrees Fahrenheit and place the taquitos in your air fryer basket or tray and cook for about 5 minutes or until heated through, turning halfway through cooking time. I often find air fryers can vary quite a bit (because of brands, styles and so forth), so just keep an eye on your taquitos to ensure they don’t burn.
Microwave: Place the taquitos on a microwave-safe plate and heat in 15-second intervals until heated through. This method will yield the least crispy results but works in a pinch.
More Yummy Moose Recipes
If you make this moose taquitos recipe, be sure to leave a comment below!

Moose Taquitos (Or Use Beef)
Ingredients
- ¾ pound cooked moose meat (or cooked roast beef), shredded (about 3 cups or 12 ounces)
- 2 teaspoons chili powder
- 1 teaspoon ground cumin
- 1 teaspoon onion powder
- 1 teaspoon garlic powder
- ½ teaspoon ground cayenne pepper
- ½ teaspoon smoked paprika, or ground chipotle chili pepper
- ½ teaspoon dried oregano
- ½ teaspoon salt
- ½ teaspoon freshly ground black pepper
- 1 (4-ounce) can chopped green chilies, or salsa
- 8 ounces shredded Monterey Jack cheese, about 2 cups (I used a jalapeno variety)
- 20 (6-inch) flour tortillas, approximately (use corn tortilla for a more traditional version)
- corn oil, as necessary (If baking, you'll need about 1 tablespoon, plus a little more to grease the sheet pan. If frying, you'll need enough to fill the pan or pot to about ½-inch up the sides.)
Optional Garnish and Serving Ideas
- Chopped cilantro
- Minced red onion
- Chopped tomatoes
- Shredded lettuce
- Crumbled cotija cheese
- Guacamole
- Sour cream, or Mexican crema or plain Greek yogurt
- Salsa
- Hot sauce
Instructions
Assemble the Moose Taquitos
- Making the filling: In a large mixing bowl, combine cooked moose meat, chili powder, cumin, onion powder, garlic powder, cayenne pepper, smoked paprika, oregano, salt, black pepper, chopped green chilies and Monterey Jack cheese. Stir to combine until everything is well incorporated.
- Warm the tortillas to make them pliable. You'll want to warm the tortillas in batches, basically warming more tortillas after you have the first batch filled. To warm the tortillas, place a stack of 5 or 6 tortillas on a microwave-safe plate and cover with a damp paper towel. Microwave for 20 to 30 seconds. Keep the warmed tortillas warm (by wrapping in a clean tea towel) while you are filling them.
- Assemble the taquitos: For each taquito, place about 2 tablespoons of the moose meat filling towards the bottom half of a tortilla, spreading out horizontally in a line (kind of like a log). Roll up tightly. Continue this process until you have all the taquito filling used. Now, you can either bake them or shallow fry them.Note: To roll the taquitos, start from the filling end. Bring the bottom of the tortilla up over the filling, gently folding in and rolling up as you go along.
To Bake the Moose Taquitos
- Preheat the oven to 400 degrees Fahrenheit.
- Grease a large sheet pan (or two smaller ones) with a little corn oil and set aside (alternatively, you can spray the sheet pan with cooking spray or line with parchment paper).
- Place the taquitos seam side down onto the prepared sheet pan (the taquitos should be placed on the sheet pan in a single layer, without touching).
- Brush the taquitos with about 1 tablespoon of corn oil (or lightly spray with cooking spray). Bake for 15 to 18 minutes or until the taquitos are golden brown and crispy on the outside and heated through, rotating the sheet pan halfway through cook time to ensure even baking.
- Once done, transfer the taquitos to a serving plate and garnish (if desired) with cilantro, red onion, tomatoes, lettuce and cotija cheese. Serve with guacamole, sour cream, salsa or hot sauce if you like. Enjoy!
To Fry the Moose Taquitos
- Preheat the oven to 200 degrees Fahrenheit (so you can keep the taquitos warm as you are frying the batches).
- Pour corn oil into a large heavy-duty pan or pot with deep sides suitable for frying until it reaches ½-inch up the sides of the pan or pot. (For this recipe, I like to use a cast-iron pot that's about 3 to 4 inches deep).
- Heat the pot of oil over medium heat until it reaches 375 degrees Fahrenheit.Note: A candy or deep fry thermometer is a great tool to use to check the oil temperature. If you don't have one of those, tear off a piece of tortilla (or use a small piece of bread) and add it to the oil. If it starts to fry and turn nicely golden brown within about 30 to 40 seconds, your oil should be ready. If not, continue to heat the oil until it's ready. If it browns immediately, your oil is too hot.
- Before frying, secure each taquito with a wooden toothpick through the seam (so it stays together as you fry).
- Cook the moose taquitos in batches (about 3 to 4 taquitos per batch) so you don't crowd the pot. To cook, add 3 to 4 taquitos to the pot of oil (seam side down), turning/rotating them partway through cooking until they're golden brown and crispy on the outside and the filling is heated through, about 2 to 3 minutes. Adjust the temperature, as necessary, to maintain the heat.Tip: Monitor and adjust (as necessary) the heat/temperature of your oil as you are cooking the batches of taquitos. You don't want the heat too high (because it will burn your taquitos), but you also don't want it too low (because the taquitos will absorb too much oil).
- As each batch of taquitos are cooked, carefully remove them from the oil and drain them on a paper towel-lined plate. Remove/discard the toothpicks. Then place the taquitos on a sheet pan in the preheated oven set to 200 degrees Fahrenheit to keep warm as you are cooking the remaining batches. Repeat to cook remaining taquitos.
- Once all the taquitos are cooked, transfer them to a serving plate and garnish (if desired) with cilantro, red onion, tomatoes, lettuce and cotija cheese. Serve with guacamole, sour cream, salsa or hot sauce if you like. Enjoy!
A note on times provided: appliances vary, any prep and/or cook times provided are estimates only.
© Girl Heart Food Inc. Photographs and content are copyright protected.
Tried this recipe?
If you do make this recipe, thank you!! It would mean so much if you could leave a comment below. Love to know how you enjoyed it, and it helps other readers too!


Gerry Yetman says
I had previously tried making moose taquitos but this recipe is the best yet. I used salsa Verde rather than green chilies and the tortillas were a 50/50 corn/wheat. Brushed them with olive oil and cooked them in the air fryer. Everyone totally loved them. My other favorite appetizer is moose Alouettes.
Dawn | Girl Heart Food says
That’s wonderful, Gerry!! I’m so glad you all enjoyed the recipe, thank you!!
David @ Spiced says
Haha – as soon as I saw the title of this recipe pop up in my inbox, I said “I bet that’s Dawn!” Not many folks I follow share moose recipes! 🙂 While I’m definitely in the “If you don’t have cooked moose meat on hand” population, I would love to try it sometime. (I can certainly use beef in the meantime.) These taquitos sound delicious – my kinda comfort food for sure!